


.avif)


This incident response guide distills the best practices we've learned from helping hundreds of teams resolve over 100k incidents. You'll learn key pointers to help you build your incident response plan, from preparation, handling, to post-incident actions.
What is an Incident?
At the broadest level, an incident is defined as an “unexpected event that disrupts business operational processes or reduces the quality of a service.” You may wish to adjust or refine this definition based on your organization’s specific circumstances.
{{subscribe-form}}
Phases of Response
The incident response lifecycle spans beyond identifying and resolving the problem. We look at incidents holistically across the following phases:

1. Prepare
This is the ongoing work of maintaining and improving your incident response process and preventing incidents by ensuring that systems, applications, and data handling processes are sufficiently secure and reliable. This includes:
- Tabletop scenarios to talk through response strategies
- Red team exercises and other incident simulations
- Security awareness training for employees
- Developing and documenting incident response playbooks and practices
- Establishing on-call rotations for incident response teams
- Other activities related to building a healthy incident response culture.
Setting Up On Call Rotations
In order to quickly and consistently assemble an incident response team when an alert breaks, you’ll need to implement an on-call rotation of responders. This rotation is typically managed through an on-call management tool like Rootly On-Call.
Define On-Call Expectations
Employees should receive clear expectations before entering an on-call rotation. These should outline:
- How quickly they are expected to respond to pages
- What they should do if they receive a page
- The duration of their on-call shifts
- What to do if they become unavailable due to an emergency
Set Up the Schedule
When setting up an on-call schedule, your goal is to ensure there is 24/7 coverage for each on-call role. Response plans should ensure any roles that are required during incidents (for example, Incident Commanders) have an on-call schedule. Depending on your incident response team’s size and preferences, you may choose to opt for shorter, more frequent shifts, or longer, less frequent shifts.
Always have a backup. Life happens, and especially if you implement longer on-call shifts (a week at a time, for example), chances are there will be times that someone can’t get to the page right away. If a page is missed, it will go to the backup responder (also known as the “secondary on call”).
Wellness for On-Call Responders
Working on call can be demanding and difficult. Don’t forget to acknowledge the mental toll of being on call, and provide support where needed. This can include:
- Encouraging regular activity during on-call shifts. As long as they have a phone on them and are prepared to jump into action if needed, there’s no need for people to stay glued to a screen.
- Providing self-care reminders at the beginning of on-call shifts or during on-call training. Sometimes we all need a little nudge to remind ourselves when we need to take a 5 minute walk, grab a snack, etc.
- Leaning on the secondary on-call when needed. They’re there for a reason!
2. Identify
This step in the incident response process is critical. It encompasses the process of discovering, triaging, validating, categorizing, scoping, and prioritizing suspected incidents. Incidents may be identified through various methods, including:
- Observability dashboard alerts
- Customer reports
- Internal reports
Once an incident is identified, the on-call responder should start a Slack channel and note the following information pertaining to the incident:
- Title: The name that will be used to refer to the incident and its Slack channel.
- Commander: The incident commander on-call who will be responsible for managing the incident.
- Severity: Describes how severe the incident’s impact is based on predefined criteria.
- Description: A brief description of the problem and its impact.
- Private or Public: Public incidents are visible to anyone in your organization’s Slack, Private incidents require a private Slack channel and are only accessible to those within the response group. In most cases, you should default to Public incidents. However, if an incident may constitute a data breach or litigation risk, handle it privately to minimize exposure.
Assigning Severity
Severity levels are a categorization of the level of impact an incident has on the business. An incident severity level should be assigned as soon as an incident is confirmed. Severity may change as the incident unfolds. When unsure between two severity options, default to the higher option and downgrade if needed. This should be a relatively quick assessment by the Commander, not a prolonged conversation.
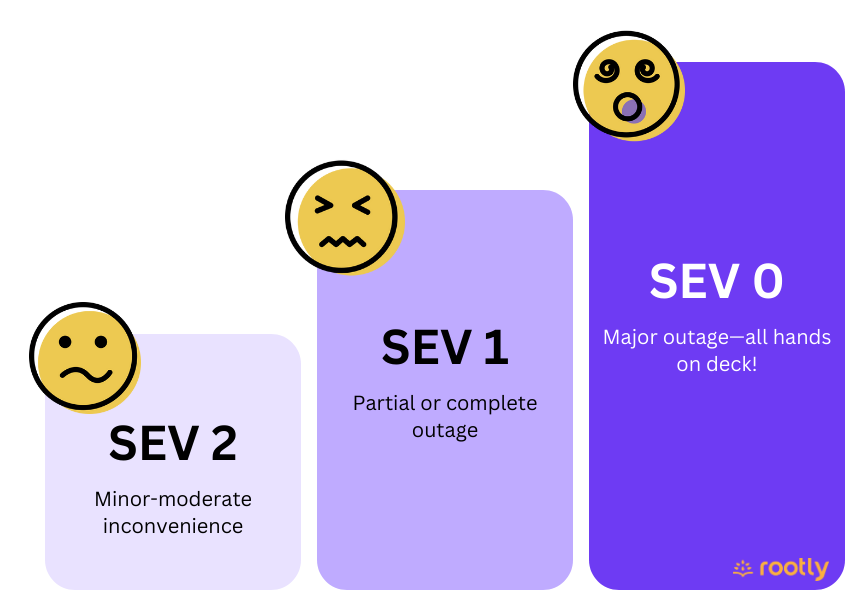
SEV 0 or Critical or P0
Failures that are catastrophic in nature such as security breaches or a complete outage that makes your product unavailable for the target audience. It completely brings the business to standstill and may lead to loss of revenue and/or reputation.
SEV 1 or Major or P1
Issues that cause partial or complete outages on the product, have workarounds or impact only a subset of customers.
SEV 2 or Minor/Moderate or P2
Users are able to complete actions as usual, but experience minor nuisances and inconveniences.
3. Assemble
Once an incident is declared, is to assemble the response team. Each response team member should be added to the Slack channel assigned a role so they have a clear understanding of their scope of responsibility throughout the incident response lifecycle. .
Response Team Roles
These roles should be assigned for every incident, each with clearly defined response actions:
- Commander: Responsible for coordinating the overall response, ensuring the right people are in the room and tasks are identified and delegated appropriately in order to resolve the incident as quickly and effectively as possible.
- Scribe: Responsible for ensuring all key information and tasks are documented and keeping record of the incident’s timeline.
These additional roles are not always needed, but should be clearly assigned when they are used in the response program. Whether these optional roles are included should be determined by the Incident Commander.
- Communications Lead: The decision maker responsible for strategizing and executing all internal and external communications efforts related to the incident. This role should be assigned any time an incident warrants communication beyond status page updates.
- Executive Sponsor: The senior most escalation point to approve key decisions during the incident response. All SEV 0 incidents should have an Executive Sponsor.
- Legal Counsel: Internal or retained legal counsel responsible for managing legal risk during the incident, including providing legal insight during decision making and reviewing all communications.
- Data Analyst: Responsible for producing data to aid decision makers throughout the incident, may include quantifying the scope, financial impact, and business impact.
- Customer Support Lead: The voice of customer support during the incident. Responsible for operationalizing Support responses (managing ticket queues, etc) and creating support-facing messaging and resources with approvals/support from the Communications Lead.
- Subject Matter Expert: An individual with specific knowledge relevant to the affected product or service. Responsible for providing context and knowledge to assist with decision making and communication throughout the incident.
Handoffs Between Response Team Members
While it’s ideal to have one dedicated person in each incident role, occasionally this is not possible due to long-running incidents, shifts ending, vacation time, etc. That's why you need to define handoff guidelines as one of your response processes. When a handoff is needed, take these steps to ensure nothing slips through the cracks:
- Inform the incident team. Post in the channel ahead of time that you will be stepping away and inform the team who will be replacing you in your role.
- Communicate any ongoing tasks or key information to whoever you are handing off to. If needed, have a quick huddle or video call to pass on as much context as possible and answer any questions they may have.
- Confirm that the commander is aware of the handoff and has all necessary information from you to continue managing the incident.
- Post a clear update in the channel when your shift ends to remind the team you are stepping away and who the new point of contact is. To avoid confusion, it is often best to leave the Slack channel unless you expect to be taking back over again.
4. Contain
During containment, the goal is to take immediate action to minimize customer impact, financial and/or reputational loss, theft of information, or other disruption. For example, performing a failover to restore service to customers, or implementing a temporary patch to close a security vulnerability.
Initial communication, such as a holding statement to acknowledge the problem, may also take place during this phase. The Communications Lead is responsible for determining which communication methods to employ, and producing or approving messaging drafts.
Incident Communication Methods
Status Page
A status page is the first line of communication to share real-time incident information with your customers. As soon as an incident is confirmed to have customer impact, update your status page with a description of the issue and its impact, and your progress towards resolution. Once an incident is visible on your status page, aim to update it every 30 minutes at minimum (even if it’s just to say you’re continuing to investigate the problem).
Social Media
Whether or not social media is part of your incident communications strategy will depend on your overall use of social media and the visibility of the incident. This decision should be made at the discretion of the Communications Lead.
The two primary ways to use social media communication during incidents are:
- Reactively: Responding to mentions and messages related to the incident.
- Proactively: Posting publicly to acknowledge the incident and provide updates.
When determining if/how to use social media, consider:
- How visible is the incident currently? Is an acknowledgement expected or is your audience mostly unaware?
- Are you equipped to handle an influx of responses once you post publicly?
- Do you typically communicate with customers via social media, or is this unusual for your brand?
Traditional Media
If an incident is highly visible and/or you operate a public company, you may receive press inquiries. Similar to social media, you can choose to disclose an incident to the press proactively, or respond to inquiries on a reactive basis. This decision should typically be made by the Communications Lead in conjunction with the Executive Sponsor and Legal Counsel.
Customer Emails
In some incidents, you may need to communicate with customers directly via email. Do so if an incident requires action on their part, or if the incident is critical and/or long running. Your goal should be to acknowledge the issue and empathize with the customer, and provide clear reassurance around progress and next steps. If considering this direct to customer communication, leverage your Customer Support Lead role in conjunction with the Communications Lead.
Anticipate Follow-Ups
Any time you choose to communicate about an incident externally, be prepared for follow up questions that are likely to come, so you can begin preparing responses and guidance for your customer support teams who will likely be fielding these in customer interactions. Some common questions to expect:
- Will I be compensated for this?
- Will you be sharing a post-mortem/retrospective after the incident is resolved?
- What are you doing to prevent this from happening again?
- How long until the problem is resolved?
You might not have the answers to all of these questions right away—that’s okay. Focus on how you can communicate what you do know and manage expectations around the things you don’t know. For example:
“When will this be fixed?”
❌ We’re still investigating so I can’t provide an ETA yet.
✅ We have all hands on deck working towards a resolution as quickly as possible. While we don’t have an estimated time for resolution yet, we’re updating our status page every 30 minutes at minimum until we resolve the problem, so please stay tuned for updates. We appreciate your patience.
Mandatory Disclosures
If you are experiencing a data breach, consult your Legal Counsel right away to determine any additional mandatory disclosure requirements, such as SEC Form 8-K, etc.
5. Resolve
After the incident has been contained to minimize impact, efforts should focus on eliminating any elements of the incident from the environment to restore systems and recover normal operations as quickly as possible.
This also includes any additional communications needed to customers, media, etc. to confirm the resolution of the issue and set expectations regarding post-incident actions.
6. Reflect
After an incident is resolved, it’s crucial to reflect on the factors that caused it, the successes and challenges encountered during the response, and the steps that can be taken to better respond to or prevent similar issues in the future. This is done by conducting a retrospective meeting. This is a structured and facilitated session to review the incident and the response, and identify actionable steps to implement improvements as a result of it. Here’s how to run one successfully.
Book it ASAP
Allow for no more than 2-3 days to pass between an incident’s resolution and the retrospective. This may mean moving calendars around to accommodate a short timeline, but it’s important that everyone goes into the retrospective with the incident fresh in their mind.
Prepare the Doc in Advance
Create a retrospective template with any relevant docs, links, and timeline events that attendees should review before the meeting.
No Spectators
Retrospectives are a great learning opportunity, but the wider sharing should take place after the retro is conducted. Keep retrospective participants to only those who were key response team members during the incident. This helps keep the conversation on track, creates psychological safety for participants, and ensures a balanced perspective.
Have an Objective Facilitator
This is a slight exception to the guideline above. Have someone who was not directly involved in the incident facilitate the retrospective meeting. The facilitator isn’t there to share their opinions, but to guide the discussion and keep the retro on track and paced appropriately. They can also determine the structure for the retrospective.
Set the Ground Rules
The facilitator is responsible for setting the tone and expectations for the retrospective. This means clearly communicating the purpose, structure, and goals of the retro to all attendees, and holding the group accountable to those throughout the meeting. This is also where they should establish any expectations around behavior and etiquette, for example:
- No finger pointing. This isn’t a performance review or an exercise of who is to blame. It’s fine to acknowledge actions taken and their impact, but avoid criticizing individuals.
- Balance the conversation. Make sure you’re giving others the opportunity to share their perspective.
- If possible, turn your camera on when you are speaking. It helps people keep track of who is talking during remote meetings.
Create a Follow-Up Plan for Action Items
A good retrospective will produce action items—these are tasks to be completed based on the lessons learned during the incident. They’re usually aimed at preventing similar incidents from recurring, or strengthening incident response processes. Each task should be assigned to an owner who is accountable for its completion, and a due date for when the task is expected to be completed. If a task is so large that the due date is more than several weeks away, try to break it into smaller tasks. The owner should also ensure the task is tracked appropriately outside of the retro doc. This might mean creating a Jira issue, or other project management tracking methods you use.
Conquer Complexity with Rootly
Incident management is a complex, cross-functional effort. There’s no need to do it the hard way by relying on memory and manual effort to conduct a successful response. Rootly takes the toil out of incident management by seamlessly integrating and automating your response process and tooling right in Slack. Here are a few of the ways Rootly simplifies incidents:
- Use emoji reactions to automatically generate and export retrospective timelines to Confluence, Google Docs, Dropbox Paper, or Rootly using pre-made or custom retrospective templates.
- Build custom workflows to automatically perform actions like paging, escalating, sending reminders, pulling logs, surfacing playbooks, adding users, and more.
- Update your Rootly or Atlassian status page right from Slack.
- Assign and track Incident Roles and Tasks in Slack so you can always see who is involved and what they’re working on without leaving Slack
- Action items created in Rootly automatically sync with ticketing tools like Jira, Asana, Zendesk, Linear, and more.
- Automatically track all your incidents and metrics in a simple to use web interface.
Learn more and book a free, personalized demo.
